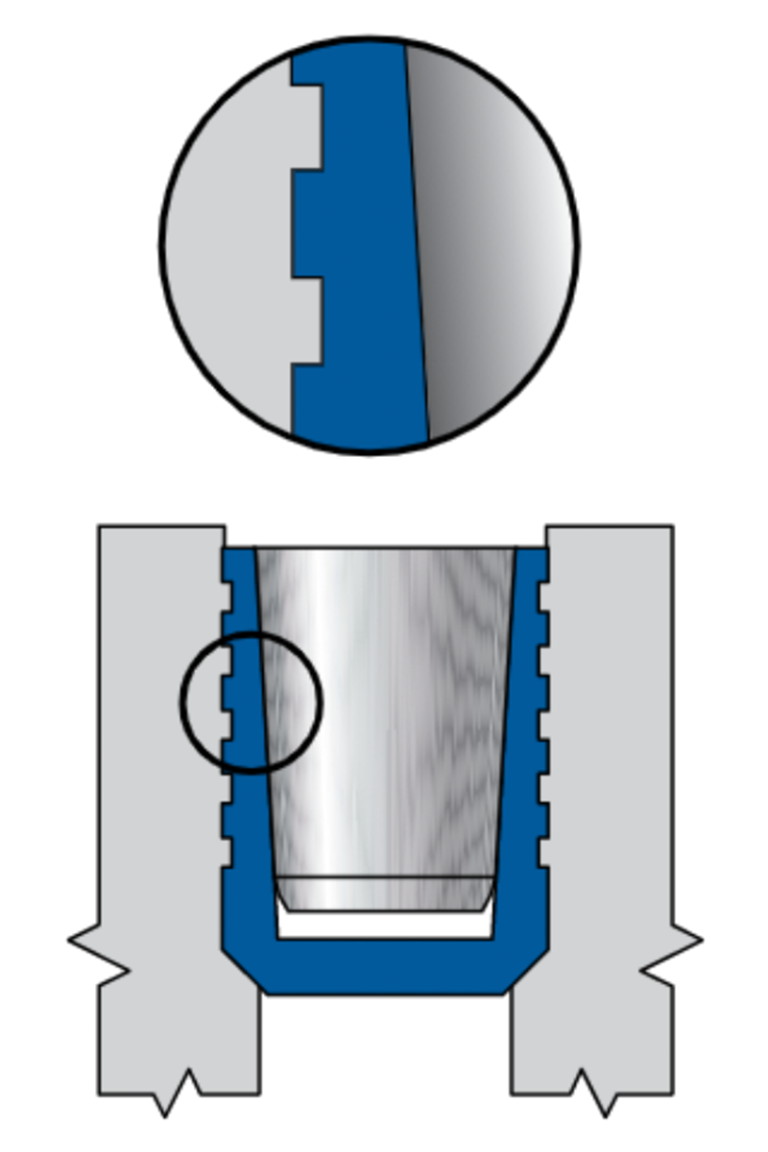
 The Lee Plug® is a cylindrical plug with a tapered hole partway through its center and numerous small grooves on its outside diameter. It is slipped into a reamed counterbore in the product. A tapered pin is then driven into the plug until the ends of the pin and the plug are flush with each other. The controlled expansion causes the lands and grooves of the plug to “bite” into the surrounding material, forming independent seals and retaining rings. This creates a positive, reliable, leak and trouble-proof seal for both liquids and gases. This simple installation method, known as the Lee Controlled Expansion Principle, opens the way to vast improvements in the design and manufacture of all fluid devices.
The Lee Plug is simply the most successful method to seal drilled holes for critical applications. Over 200 million are in use on aircraft, missiles, spacecraft, machine tools, downhole oil tools, and molds – anything that requires a permanent leak-proof seal.
Lee plugs are manufactured to exacting tolerances. Every process is precisely controlled. Critical dimensions are 100% checked and others are statistically checked. All plugs and pins are 100% visually inspected. In addition, every lot of pins and plugs is production acceptance tested. A representative sample of the mating pin or plug is performance tested to a Lee process specification for installation, leakage, pin retention, proof pressure, and thermal stability. Two certificates of performance (one for the pin lot and one for the plug lot) accompany every shipment of Lee plugs.
The Lee Company offers four different types of expansion plugs: the original Lee Plug, the QIP® plug, the R.F.O.® plug, and the high strength plug. The Lee Plug is stocked in five materials in imperial sizes (2024-T4 or T351 Aluminum, 7075-T6 or T651 Aluminum, 416 CRES, 303 CRES, and R405 Monel) and three materials (2024-T4 or T351 Aluminum, 416 CRES, and 303 CRES) in the metric sizes. In addition, Lee Plugs are available in 2024-T6 Al, 6061-T6 Al, 316 CRES, MP35N, and 6AL-4V Ti.
For sealing holes in thin walls or fragile materials, the R.F.O. plug is available. Because the R.F.O. doesn’t require a seating shoulder, holes in extra-thin-walled canisters, tanks, piping, or ducts can be sealed. The installation system ensures that no downward pressure is applied to the product.
For high pressure systems, The Lee Company has developed the high strength plug. The design has been optimized for use in high strength and/or high hardness materials such as the precipitation hardening steels and titanium commonly found in high pressure systems.
MATERIALS
Lee plugs and pins are made from materials that fall within the overall limits of the specifications shown. The Lee Company exclusively purchases mill runs of material controlled to closer physical and chemical limits per our specification. We do not approve the use of material meeting only the 416 specification.
PLUG PROOF PRESSURE
To assist designers in the proper selection of our plugs, a “proof pressure” is given for up to three hole tolerances (Classes I, II, III). The plug’s proof pressure is the highest hydrostatic pressure that may be applied in the course of routine production acceptance testing.
The proof pressure values on our website are defined for plugs when installed into boss materials identical to that of the plug. When installing plugs into dissimilar materials, please contact our engineers for proof pressure recommendations.
Plugs should be selected conservatively. This will provide an additional safety margin for chance situations where the installation process might fail to meet specifications or where pressure transients or other factors are unexpectedly severe. As a general guideline, we recommend the proof pressure of the plug chosen exceed the burst pressure of the system.
Note: Aluminum plugs not recommended for use above 275°F.
SURFACE TREATMENT OF INSTALLATION HOLES
Proof pressure data for Lee components are given for installation in bosses without any surface treatment having been applied.
Passivating stainless steel installation holes per MIL-S-5002 or ASTM A 967 has no effect on the performance of Lee components. For aluminum, we recommend untreated installation holes. That said, anodized holes per MIL-A-8625 Type II are generally acceptable.
We do not approve the use of some proprietary surface treatments which include the deposition of solid lubricants such as Teflon® synthetic polymer.
Teflon is a registered trademark of E.I. Dupont de Nemours & Co., Inc.
THE DEPTH OF THE REAMED HOLE
The “A” Dimension on the hole charts shows the depth of the reamed hole recommended for maximum holding power. When using the recommended “A” dimensions, the back end of the plug and pin will always be at least 0.010 inches below the surface of the material. If it is desired to improve the appearance of the assembly, and maximum holding power is not a major concern, then the depth of the reamed hole can be made to equal the “M” dimension plus 0.010 inches. In doing so, the finished installation will be flush with the material surface. However, this will cause a reduction in proof pressure of approximately 20% for short Lee Plugs and 15% for long Lee Plugs. This procedure is not recommended for high strength plugs.
SELECTION OF THE PROPER CLASS OF FIT
As a general rule, the lowest class of fit compatible with pressure requirements should always be used. This will result in the lowest possible installed cost of the plug since the lower the class of fit, the wider the tolerance band on the hole. The looser tolerances reduce machining time and the time required to inspect the reamed hole.
Note that the selection of the lowest class of fit does not ensure the lightest interference fit in the reamed hole. It merely means that the interference can be anywhere from light to heavy. On the other hand, the highest class always ensures the heaviest interference fit. In cases where less interference is desirable, you should dimension your reamed hole using the maximum diameter from the lowest class and the maximum diameter from the next class up. In this way, you will have a total tolerance of 0.001 inches and the lowest stresses in your material. Under these conditions, the proof pressures would be the same as for the lowest class fits.
ELONGATION
The expansion of a plug causes the boss material to be deformed, resulting in radial growth of the boss I.D. and O.D. To accommodate this growth, some consideration must be given to the ductility of the boss material. Generally, the boss material should have an elongation of at least 3%.
A typical plug installation will expand the boss I.D. by approximately 0.003 inches. Since this expansion remains relatively constant for all sizes of plugs, the smallest sizes are subject to the greatest percentage deformation. The worst case is a 0.093 inch diameter plug which will be expanded to 0.096 inches in a boss or 3%. Thus, if the boss material has an elongation of over 3%, the boss will not crack from the installation of the plug.
BOSS STRESS
Note: In many cases, the factor limiting the boss diameter will be the proof pressure requirement and not the stresses.
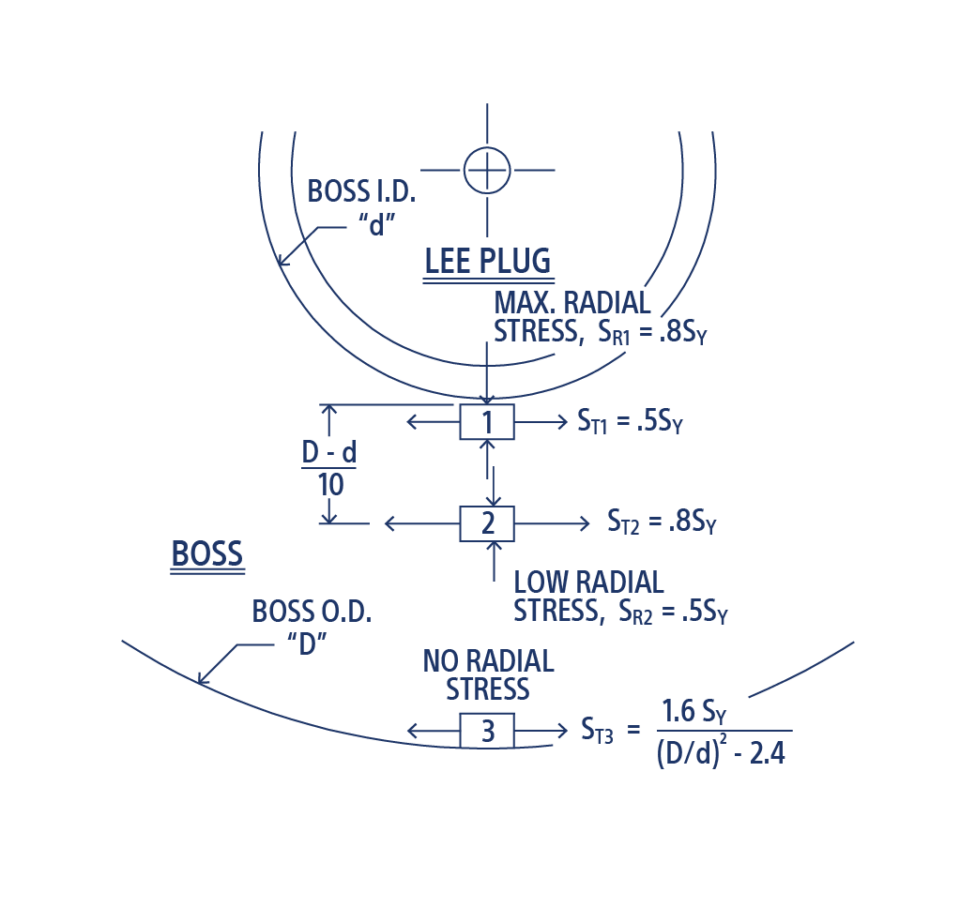
The success of the Lee Plug is founded upon its ability to provide high proof pressures with low external boss stresses. If a typical installation is considered to be the equivalent of a 0.003 inch interference fit, then the hoop stresses (ST) can be expressed as a function of the plug diameter (d), boss diameter (D), and yield point stress in tension (SY) of the boss material. The plug’s lands and the boss material plastically deform, and in conjunction with the grooves, interlock to form many seals. This interlocking creates discontinuous bands of stress which quickly average out to uniform stress at a diameter within the boss of 1.2 d or more.
The boss stresses, both tangential tensile (ST) and radial compressive (SR) vary throughout the boss. At the interface between the plug lands and the boss (Pt. #1) SR1 is high and ST1 is low. At Pt. #2, SR2 is low and ST2 has reached its maximum. At Pt. #3, the only stresses are ST3 and the values are shown on the curve of ST3 below.
UNSYMMETRICAL BOSS STRESS
For bosses that are not round, the analysis is more complex, and thus a formula has been developed* to aid in the solution of this difficult problem. The following formula allows a stress concentration factor, K, to be calculated as a function of certain boss geometric parameters. The formula is reasonably accurate, somewhat conservative, and applies to the stress in the plug boss at the minimum wall thickness area.
*See Lee Technical Report No. 08-9-1-181 (Analytical Study to Evaluate Stresses in Unsymmetrical Lee Plug bosses).
Where:
r = Boss wall thickness ratio (T/t)
at = angle of thin wall sector (deg.)
T/t Ratio: This is the ratio of the maximum boss wall thickness to the minimum wall thickness. It is an indication of the non-symmetry of the boss, and has a value of 1.0 for a round boss.
Angle: The angle is that sector of the boss which is at the minimum wall thickness. A round boss would have an angle of 360 degrees.
D/d Ratio: This is the ratio of the boss diameter at its minimum radius to the plug outside diameter.
See Figure 1 below for examples of how the geometric parameters apply to real Lee plug bosses and Figure 2 below for a plot of the formula results.
A typical problem is solved by using the round boss solution method with the D/d ratio as described above. The calculated stress is then multiplied by a stress concentration factor as determined from the formula.
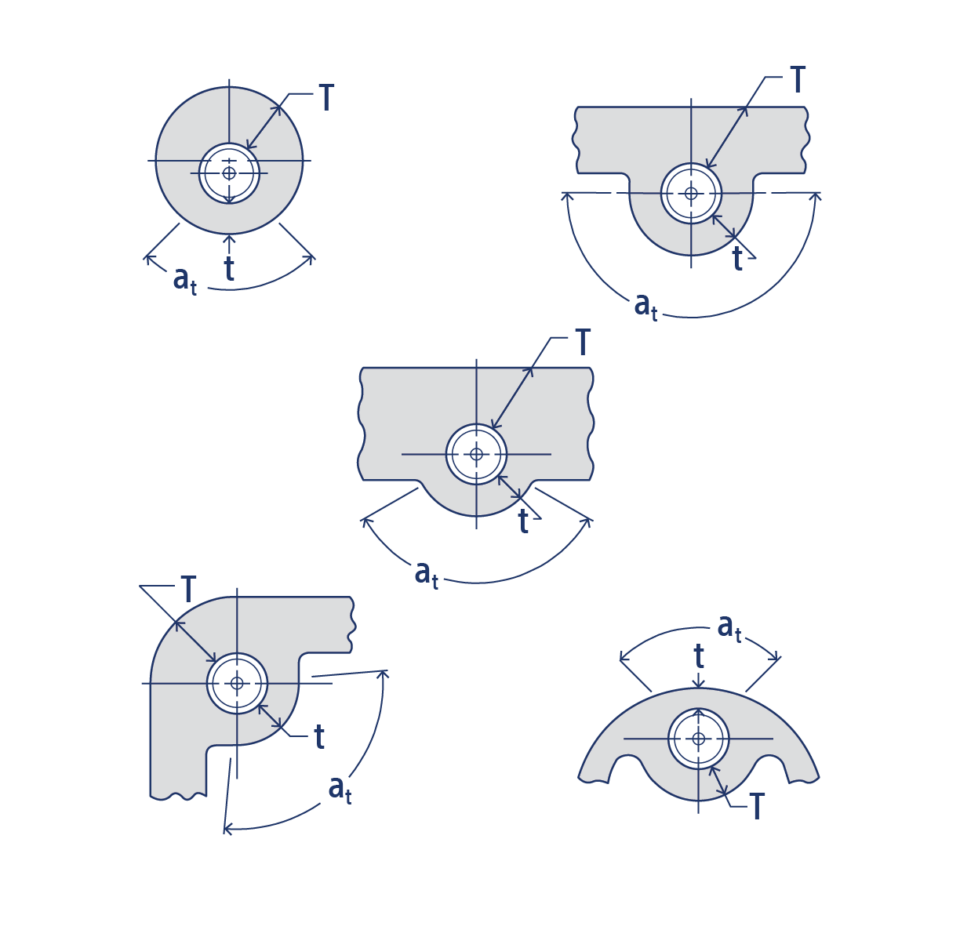
These figures illustrate the applicability of the geometric parameters to variously shaped plug bosses.
NOTE: Although “t” is always the boss minimum wall thickness, “T” should be selected to be representative of the thick wall of the boss.

BOSS STRESS – DISSIMILAR MATERIALS
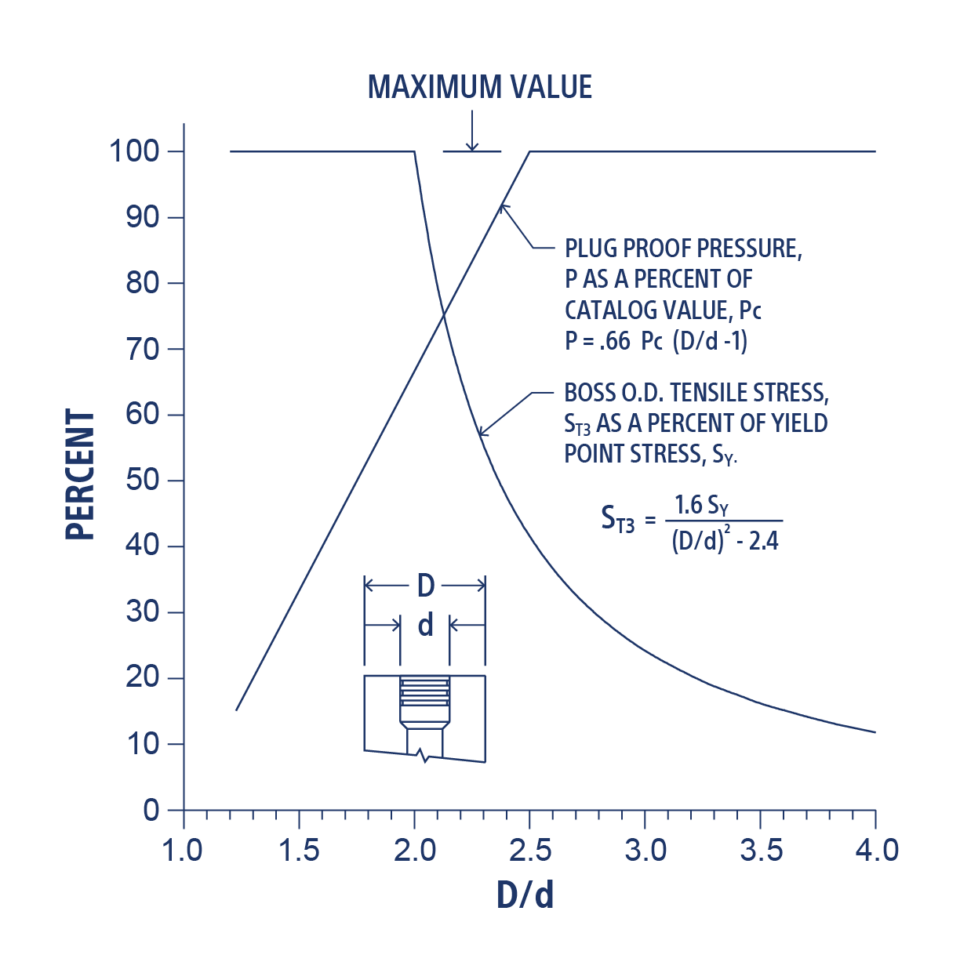
When a Lee plug is installed in a boss material of dissimilar mechanical properties, its proof pressure will be best maintained by observing the D/d ratios shown on the graph below. The stress at the O.D. of the boss will be below 40% of the tensile yield strength of the boss material when using these curves. This is a stress level that has been determined to be satisfactory in most applications.
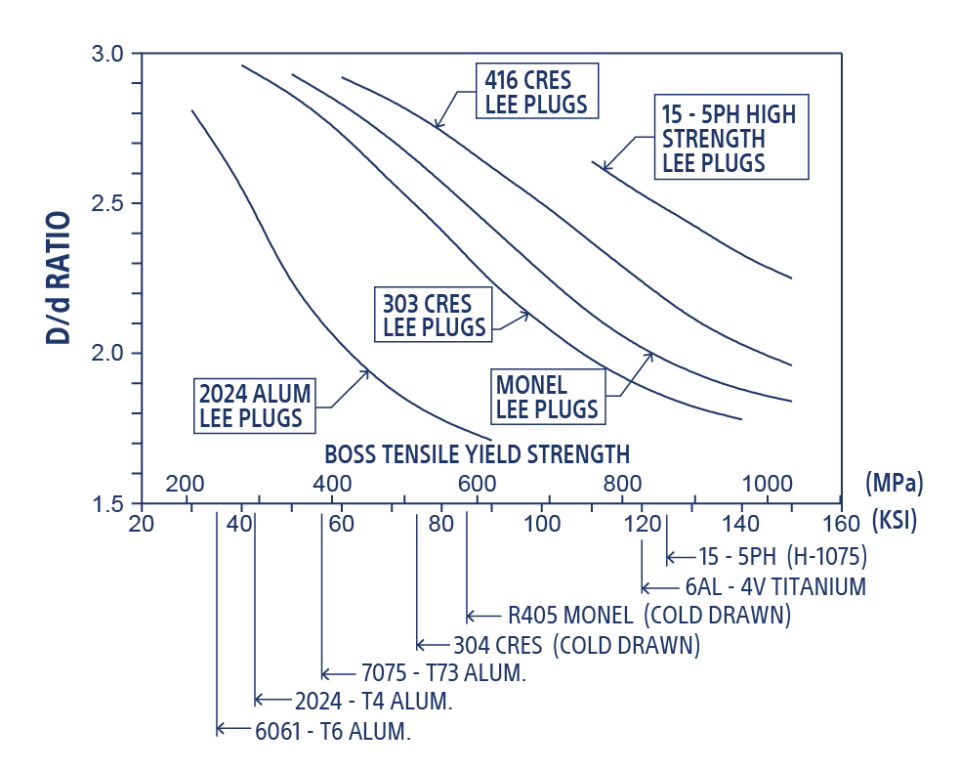
Example: A 303 CRES plug is being designed into a 15-5 PH CRES housing. As can be seen from the graph, a D/d ratio of 1.9 is recommended to assure the rated proof pressure of the plug. In designing the boss with a D/d ratio of 1.9, the designer achieves a weight savings of 42% relative to a boss designed with a D/d ratio of 2.5.
When a plug is installed in a weaker boss material, the holding strength of the plug will be limited by the strength of the boss material. Though the rated proof pressure will most likely be maintained, the choice of a significantly weaker boss could lessen the rated proof. The Lee Company should be contacted for technical assistance if there are questions about the plug/boss strength compatibility.
When a plug is installed in a stronger boss material, the surface finish of the installation hole increases in importance. If the plug is significantly weaker than the boss material, retention relies more heavily on the friction at the plug/boss interface than on the plug grooves. Though the rated proof pressure will most likely be maintained, a surface finish that is smoother than the recommended limit may reduce the proof pressure of the plug.
STRESS CORROSION
When certain materials are subjected to the combined effects of sustained tensile stress and a corrosive environment, over a period of time, structural failure may occur at a stress lower than the material would normally withstand. This phenomenon is known as stress corrosion cracking, and it may occur in an environment that is not severely corrosive in the normal sense. To avoid failure, tensile stresses must not exceed a threshold value which is a function of the material and the application.
The boss in which a plug is installed will generally not be susceptible to stress corrosion cracking if a highly resistant boss material is used, and the D/d ratio is 2.5 or greater. The plug is not subject to stress corrosion since it is in compression throughout. Other values of D/d may be required if the mechanical properties of the boss differ significantly from those of the plug.
| ALLOY | CONDITION | YIELD STRESS (MIN.) | % ELONGation (MIN.) |
|---|---|---|---|
| 2024 Aluminum | T851 | 58 ksi | 5 |
| 6061 Aluminum (a) | T6 | 35 ksi | 10 |
| 7075 Aluminum | T73 | 56 ksi | 8 |
| 355, 356 Cast Aluminum | T6 | 17 ksi | 3 |
| 15-5PH CRES (b) | H1075 | 125 ksi | 13 |
| 300 Series CRES (a) | Cold Drawn | 75 ksi typ. | 35 typ. |
| 4130 Cast Steel | Quenched & Tempered | 85 ksi | 16 |
| 6Al-4V Titanium (a) | Annealed | 120 ksi | 10 |
| Monel Alloys (a) | Cold Drawn | 85 ksi typ. | 20 typ. |
| Inconel Alloy 600 | Annealed | 35 ksi | 30 |
(a) All conditions are highly resistant to SCC.
(b) Condition H1000 and above is highly resistant to SCC.
*The following alloys have low resistance to SCC, and are generally not recommended for Lee plug bosses (partial list): Aluminum: 2025-T3 & T4, 7075-T6, CRES: 440c (all conditions).
Always verify flow calculations by experiment.
*There are many parameters to consider when determining V-Factor. Click here for more information.